Scheduling Metadata Scans
You can schedule a metadata scan for an environment whose schema was selected or it was scanned at least once.
To schedule a metadata scan, follow these steps:
- Go to Application Menu > Data Catalog > Metadata Manager > Explore.
- On the Explore tab, click an environment tile to view its details and tables.
- Click Options .
The available options appear. - Click Schedule Metadata Scan.
- Enter appropriate values in the fields. Fields marked with a red asterisk are mandatory. Refer to the following table for field descriptions.
- Local: Refers to your local machine.
- Server: Refers to the machine where your application is deployed.
-
Add New: This option adds new objects to the existing object list. Existing metadata is not updated.
-
Update Existing + Add New: This option adds new objects to the existing list and at the same time the existing metadata is also updated.
-
Update Existing + Add New + Invalidate: This option adds new objects to the existing list and at the same time the existing metadata is also updated and invalidated.
-
Delete & Reload: This option deletes all the existing metadata and scans only the new objects that have been selected.
-
Import Comments: Select the check box to import comments.
-
Table(s): Select the check box to import Tables.
-
View(s): Select the check box to import Views.
-
Synonym(s): Select the check box to import Synonyms.
-
Version: Select the check box to create a new version of the environment. To enter version label and change description, click
 .
. - Click Schedule.

The Job Scheduler page appears.
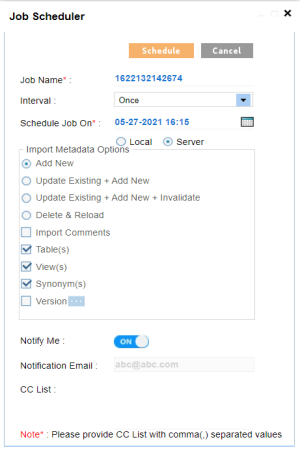
|
Field Name |
Description |
|---|---|
|
Job Name |
Specifies the job name. For example, Administrator1585030550001. This field autopopulates with a job name. You can edit it and enter a different job name. |
|
Interval |
Specifies the frequency of the job. For example, Every Week. |
|
Schedule Job On |
Set the date and time of the job using For example, 03-24-2020 11:45. |
|
Local or Server |
Select whether the job uses local or server time. |
|
Import Metadata Options |
|
|
Notify Me |
Switch Notify Me to ON to receive a job notification. For more information on configuring notifications, refer to the Configuring Notifications on Scanning Metadata topic. |
|
Notification Email |
This field is autopopulated with your email ID. You receive email notifications about the scheduled job from the administrator's email ID. For more information on configuring the administrator's email ID, refer to the Configuring Email Settings topic. |
|
CC List |
Enter a comma-separated list of email IDs that should receive email notifications about the scheduled job. For example, ab.dav@xyz.com, cal.kai@xyz.com |
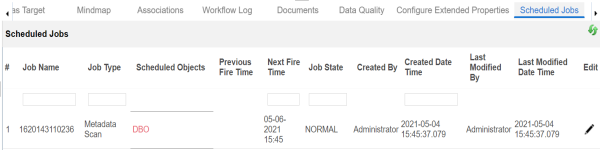
The metadata scan is scheduled and the scheduled job is listed on the Scheduled Jobs tab.
The metadata is scanned at the scheduled time and the environment is updated.
If you have opted to create new version of the environment, then a new version is created and the old version is archived.
Alternatively, on the Explore tab, select Metadata Options and click Scheduled Jobs to view the list.
Use the following options to work on the scheduled job list:
Use this option to update the scheduled job.
Use this option to delete the scheduled job.
|
Copyright © 2026 Quest Software Inc. |